How to Add a Weather API to HTML?
Find out how to add dynamic weather data to your website via a simple HTML code.
Updated January 23, 2024.
Integrating a weather API into your HTML code can provide real-time weather data directly on your webpage, enhancing the user experience. Consider its usability for personal blogs, travel websites, and event planning platforms where visitors can view up-to-date weather information from around the globe.
Below, we guide you through the steps to seamlessly integrate a weather API into your HTML code by using Tomorrow.io.
Getting Your Weather API Key
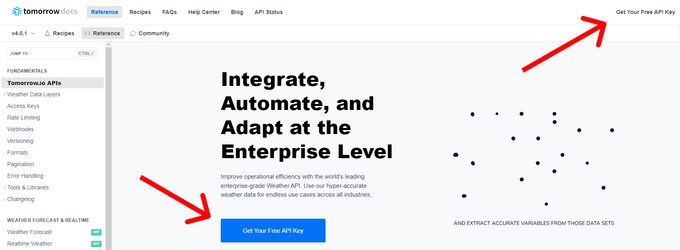
The first step to add a weather API to HTML is to get a weather API key. Simply visit Tomorrow.io's documentation and press the "Get Your Free API Key" button as shown in the image below:
Once you've finished the registration process, you'll find your API key under the API management section.
HTML Setup
The first step is to create an `.html` file, which will serve as our foundation for integrating the weather API into the webpage. You can use any text editor to create a new HTML file. Within it, set up the basic structure of your webpage, containing:
- Standard opening and closing structures with `<html>`, `<head>`, and `<body>` tags.
- Necessary HTML elements where you intend to display the fetched weather information.
Let's take a look at a simple HTML below:
< html>
  < head>
    <title>Weather API Example</title>
  </head>
  < body>
    <h1>Weather Information</h1>
    <div id="weather-data">
      <!-- Weather data will be displayed here -->
    </div>
    <script>
      <!-- JavaScript Integration here -->
    </script>
  </ body>
</ html>
JavaScript Integration
Now, to actually incorporate the weather API request into the HTML file, you need to embed it within a `<script>` element in your HTML document, as shown in the code snippet above.
Here's an example of how you can structure your `<script>` element in your HTML document:
<script>
      const options = {
        method: "GET",
        headers: { accept: "application/json" },
      };

      fetch(
        "https://api.tomorrow.io/v4/weather/realtime?location=toronto&apikey=YOUR_API_KEY",
        options
      )
        .then((response) => response.json())
        .then((response) => {
          // Handle the response data and display it
          const weatherData = JSON.stringify(response, null, 2);
          document.getElementById("weather-data").textContent = weatherData;
        })
        .catch((err) => console.error(err));
</script>
As we can see in the code snippets, we first created an HTML structure that includes a `<div>` element with the ID "weather-data" where weather information is displayed. The `<script>` element, on the other hand, contains the API request code. When the webpage loads, it will make the API request, and upon receiving the response, it will display the JSON response in the "weather-data" element.
Just remember to replace the placeholder "YOUR_API_KEY" with the API key you receive from Tomorrow.io.
Displaying Weather Information
Let's see what the webpage containing the JSON response looks like:
Styling and Design
The code snippet we've provided you with contains simple HTML and JavaScript, which should suffice for basic functionality. However, to enhance the overall look and user experience of your website, you can use CSS with a plethora of design and styling options. While we won't delve into the specifics here, it's certainly something worth exploring if you want to take your API integration to the next level.
Enhancing Your Website with Real-time Weather Data
Integrating a weather API into your HTML code enhances your website's functionality and appeal by providing real-time, accurate weather data from around the globe. The process is straightforward, making it accessible even for beginner coders. With CSS, you can customize the weather data's appearance to complement your site's overall aesthetics and enhance the user experience.


