How To Get Historical Weather Data From An API?
Unleash the power of historical weather data in your apps or websites. Learn how to do it here!
Updated November 26, 2023.
Historical weather data can be an important resource for developers working in a variety of different apps or websites, from agriculture and construction to tourism and retail. It offers valuable insights into past weather patterns, which can inform planning and decision-making processes. For instance, a farmer might use this data to determine the best time to plant crops, while a retailer might use it to predict which items will be in demand during a specific season. Nowadays, fetching this data has become pretty straightforward, thanks to the availability of APIs (Application Programming Interfaces) that provide easy access to vast amounts of historical weather records. In this guide, we will explore how to get historical weather data from an API.
Accessing Historical Weather Data with Tomorrow.io
Getting an API Key
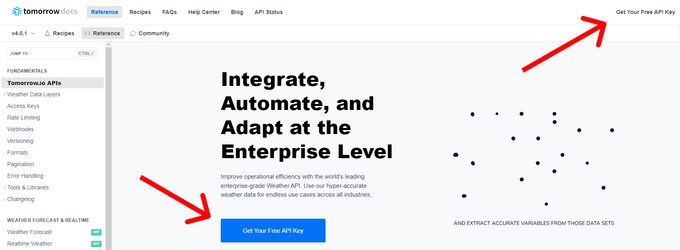
To start using the historical weather data API, you first need to get an API key from Tomorrow.io, which provides access to their vast weather data library. Simply visit the homepage and click the "Try Free Weather API" button, or visit our documentation and press the "Get Your Free API Key" button. Please refer to the screenshot below for reference.
After you finish the registration process, you can head out to the API Management Section, where you can find your API Key. However, keep in mind that the Historical Weather API requires a Premium Tomorrow.io account.
Using the Historical Weather Data API in JavaScript
After getting the API Key, head out to the Retrieve Historical Weather section of Tomorrow.io's documentation, where you can find the sample request. In this example, we've chosen to use JavaScript. Then, simply create a `.js` file where you'll paste the code snippet below:
const options = {
  method: 'POST',
  headers: {
    accept: 'application/json',
    'Accept-Encoding': 'gzip',
    'content-type': 'application/json'
  },
  body: JSON.stringify({
    location: '42.3478, -71.0466',
    fields: ['temperature'],
    timesteps: ['1h'],
    startTime: '2019-03-28T10:00:50Z',
    endTime: '2019-03-28T11:00:50Z',
    units: 'metric'
  })
};

fetch('https://api.tomorrow.io/v4/historical?apikey=YOUR_API_KEY', options)
  .then(response => response.json())
  .then((response) => console.log(JSON.stringify(response, null, 2))) // The '2' specifies the indentation level for formatting
  .catch(err => console.error(err));
To run the code, simply paste the following command in your terminal:
node app.js
Now, let's analyze the provided code. We start by configuring the HTTP request using the `options` object, specifying details like the location, desired weather fields, (in our case, temperature), time intervals, and date range. We then send a `POST` request to the Tomorrow.io Historical Weather API endpoint, passing our API key and configuration. Upon receiving the response, we parse it as JSON and log the data in our console with the correct formatting.
Of course, remember to replace YOUR_API_KEY with the API Key found in the API Management Section.
Understanding the Response
Now, let's analyze the response.
{
  "data": {
    "timelines": [
      {
        "timestep": "1h",
        "endTime": "2019-03-28T11:00:00Z",
        "startTime": "2019-03-28T10:00:00Z",
        "intervals": [
          {
            "startTime": "2019-03-28T10:00:00Z",
            "values": {
              "temperature": -0.51
            }
          },
          {
            "startTime": "2019-03-28T11:00:00Z",
            "values": {
              "temperature": -0.44
            }
          }
        ]
      }
    ]
  }
}
As we can see, we have the `data` object as a response, which is structured in timelines, where each timeline represents a one-hour timestep. For the sake of practicality, we cover the hour from 10:00 AM to 11:00 AM on March 28, 2019. Within this timeline, there are two intervals, one for each timestep. For instance, at 10:00 AM, the temperature was -0.51°C, and at 11:00 AM, it was slightly higher at -0.44°C.
Wrapping It Up
All in all, historical weather data can be quite a valuable resource that, nowadays, can be easily accessed through APIs. Developers can then use this data to enhance their apps or websites with accurate and detailed insights into past weather patterns. However, it is important to keep in mind the limitations and considerations when working with this type of data. Nevertheless, with proper planning and implementation, any developer can successfully retrieve and utilize historical weather data in their projects.

